8 min to read
Bootstrap complete Java application infrastructure in AWS with Terraform
How to bootstrap a Java + MySql application infrastructure with terraform

Terraform provides a way of describe infrastructure as code. Terraform will manage the communication with the infrastructure provider (Amazon AWS in this example) to create, update or delete infrastructure resources.
Bootstrap ElasticBeanstalk + RDS MySql application
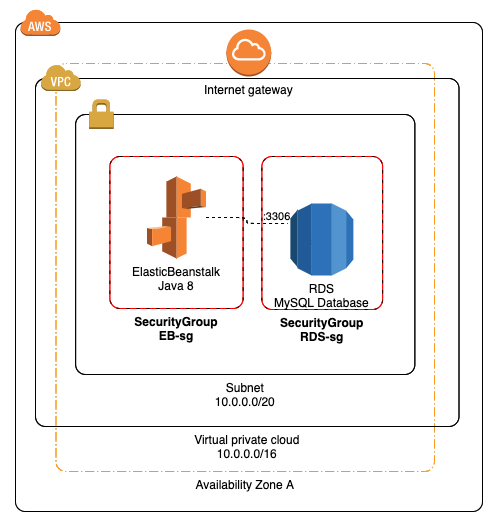
In the following example we are going to bootstrap the necessary infrastructure to serve a Java API connected to RDS MySql database.

Step 1 - Networking
We are going to create a terraform module for VPC and other networking resources:
- VPC - Virtual Private Cloud: Is a logical group of resources that are isolated from other VPCs and other customers of the Public Cloud.
- VPC Subnet : A VPC Subnet is defined by a subrange of the network IP addresses assigned to the VPC.
- Security Group : The VPC Security Groups are the way AWS implements firewalls between instances in the VPC. In a VPC all inbound and outbound network traffic is denied by default. In order to allow traffic, a security group is defined and rules are assigned to the Security Group.
The following is a terraform module to group all the needed networking resources in just one file.
resource "aws_vpc" "_" {
  cidr_block = var.vpc_cidr
  enable_dns_support   = var.enable_dns_support
  enable_dns_hostnames = var.enable_dns_hostnames
  tags = {
    Name = "${var.app-name}-vpc"
  }
}

resource "aws_internet_gateway" "gateway" {
  vpc_id = aws_vpc._.id
  tags = {
    Name = "${var.app-name}-gateway"
  }
}

resource "aws_route_table" "route_table" {
  vpc_id = aws_vpc._.id

  dynamic "route" {
    for_each = var.routes

    content {
      cidr_block     = route.value.cidr_block
      gateway_id     = aws_internet_gateway.gateway.id
      instance_id    = route.value.instance_id
      nat_gateway_id = route.value.nat_gateway_id
    }
  }
  tags = {
    Name = "${var.app-name}-route-table"
  }
}
resource "aws_subnet" "subnet-a" {
  vpc_id                  = aws_vpc._.id
  cidr_block              = "10.0.32.0/20"
  availability_zone       = "${var.region}a"
  map_public_ip_on_launch = true
  tags = {
    Name = "${var.app-name}-subnet-a"
  }
}

output "_" {
  value = {
    vpc_id = aws_vpc._.id
    subnet_a = aws_subnet.subnet-a.id
  }
}
Step 2 - RDS MySql database
Now we need to define the RDS Database with the corresponding security group, note that RDS security group has a reference to another security group, this will allow ingress traffic from elastic beanstalk instance to the database.
resource "aws_security_group" "rds-sg" {

  name = "rds-sg"
  description = "RDS (terraform-managed)"
  vpc_id = module.vpc._.vpc_id

  # Only MySQL port in for elastic beanstalk instance
  ingress {
    from_port       = var.rds-port
    to_port         = var.rds-port
    protocol        = "tcp"
    security_groups = [aws_security_group.eb-sg.id]
  }
  # Allow all outbound traffic.
  egress {
    from_port   = 0
    to_port     = 0
    protocol    = "-1"
    cidr_blocks = ["0.0.0.0/0"]
  }
  tags = {
    Name = "RDS_sg"
  }
}

resource "aws_db_instance" "rds-db" {

  name                    = var.rds-schema
  identifier              = var.rds-identifier

  allocated_storage       = 20
  backup_retention_period = 7
  backup_window           = "10:46-11:16"
  maintenance_window      = "Mon:00:00-Mon:03:00"
  engine                  = "mysql"
  engine_version          = "8.0.15"
  instance_class          = "db.t2.micro"
  username                = var.rds-username
  password                = var.rds-password
  port                    = var.rds-port
  publicly_accessible     = true
  storage_type            = "gp2"

  allow_major_version_upgrade  = false
  auto_minor_version_upgrade   = true
  performance_insights_enabled = false
  skip_final_snapshot          = true
  final_snapshot_identifier = "database-${var.rds-schema}-snapshot"

  vpc_security_group_ids = [aws_security_group.rds-sg.id]
  availability_zone         = var.rds-availability_zone
  multi_az                  = var.rds-multi_az
}
Step 3 - Elastic Beanstalk
Elastic Beanstalk is a great way to deploy Java applications, you only need to focus on the application. The service can be configured as a single instance or load balanced. In this example we are going to deploy single instance, but for production applications is highly recommended configuring as load balanced with a minimum of 2 instances, is not only about performance, with this configuration when you deploy a new version AWS will replace 1 instance at the time and wait to be in healthy state, this way we can achieve 0 downtime.
resource "aws_security_group" "eb-sg" {
  name = "eb-sg"
  description = "SecurityGroup for ElasticBeanstalk environment."
  vpc_id = module.vpc._.vpc_id
  ingress {
    from_port = 80
    to_port = 80
    protocol = "tcp"
    cidr_blocks = ["0.0.0.0/0"]
    ipv6_cidr_blocks = ["::/0"]
  }
  ingress {
    from_port = 587
    to_port = 587
    protocol = "tcp"
    cidr_blocks = ["0.0.0.0/0"]
    ipv6_cidr_blocks = ["::/0"]
  }
  egress {
    from_port = 0
    to_port = 0
    protocol = "-1"
    cidr_blocks = ["0.0.0.0/0"]
  }
  tags = {
    Name = "EB_sg"
  }
}

# ElasticBeanstalk - Application
resource "aws_elastic_beanstalk_application" "eb-application" {
  name = var.app-name
  depends_on = [aws_db_instance.rds-db]
}

# ElasticBeanstalk - Environment
resource "aws_elastic_beanstalk_environment" "eb-env-prod" {

  depends_on = [aws_db_instance.rds-db]

  name                = "${var.app-name}-prod"
  application         = aws_elastic_beanstalk_application.eb-application.name
  solution_stack_name = data.aws_elastic_beanstalk_solution_stack.java8.name
  cname_prefix        = var.app-name

  setting {
    namespace = "aws:autoscaling:launchconfiguration"
    name = "InstanceType"
    value = "t2.micro"
  }
  setting {
    namespace = "aws:elasticbeanstalk:environment"
    name = "EnvironmentType"
    value = "SingleInstance"
  }
  setting {
    namespace = "aws:autoscaling:launchconfiguration"
    name = "IamInstanceProfile"
    value = "aws-elasticbeanstalk-ec2-role"
  }
  setting {
    namespace = "aws:autoscaling:launchconfiguration"
    name = "InstanceType"
    value = "t2.micro"
  }
  setting {
    namespace = "aws:elasticbeanstalk:application:environment"
    name = "SPRING_PROFILES_ACTIVE"
    value = "prod"
  }
  setting {
    namespace = "aws:elasticbeanstalk:application:environment"
    name = "SPRING_DATASOURCE_URL"
    value = "jdbc:mysql://${aws_db_instance.rds-db.endpoint}/${aws_db_instance.rds-db.name}?useSSL=false"
  }
  setting {
    namespace = "aws:elasticbeanstalk:application:environment"
    name = "SPRING_DATASOURCE_USERNAME"
    value = aws_db_instance.rds-db.username
  }
  setting {
    namespace = "aws:elasticbeanstalk:application:environment"
    name = "SPRING_DATASOURCE_PASSWORD"
    value = aws_db_instance.rds-db.password
  }
  setting {
    namespace = "aws:autoscaling:launchconfiguration"
    name = "SecurityGroups"
    value = aws_security_group.eb-sg.id
  }
  setting {
    namespace = "aws:ec2:vpc"
    name      = "VPCId"
    value     = module.vpc._.vpc_id
  }
  setting {
    namespace = "aws:ec2:vpc"
    name      = "Subnets"
    value     = module.vpc._.subnet_a
  }
  setting {
    namespace = "aws:ec2:vpc"
    name = "VPCId"
    value = module.vpc._.vpc_id
  }
  setting {
    namespace = "aws:ec2:vpc"
    name = "AssociatePublicIpAddress"
    value = "true"
  }
}
Deploy infrastructure
With terraform, only we need to do is execute the following command, providing a file with all the variables we have defined
terraform apply -var-file="test.tfvars"
You can find the complete code of this example in this GitHub repository


